Mapping Wifi Networks on Google Earth

Something that has intrigued me since I was young was the thought of all the radio waves filling the air at any given moment, filled with information that can be translated using a special receiver. It seems amazing to me how much information is surrounding us, yet we are completely oblivious to it!

My curiosity of RF signals led me to recently look into mapping the local wifi access points surrounding my apartment, and from there it advanced to the point where I was taking my laptop wherever I went so I could get a map of APs. The process is surprisingly easy, but unfortunately it relies on a third party website. The website works great for now, but who knows how long it will be around. I'm going to cover the easy way right now, and in a future post I plan to cover a method that uses all internal tools.

There are only two pieces of hardware needed for this project:
  • A laptop with a wifi interface - I used an EeePC 1000h with windows XP installed
  • A GPS adapter for the laptop - I used BU-353 from USGlobalSat. You can find them online for about $30-40 new.
The GPS adapter and netbook
Ready to go! I usually configure the netbook to stay on when the lid is closed.

Once you have the hardware, the software needs to be installed and configured. Since we are using Windows XP, NetStumbler  is a great tool that is very simple to use, downloadable here: http://www.stumbler.net  (Not to be confused with netstumbler.com)

After it's done installing, open it up and take a look at what's around you.
APs visible from my apartment

Now hook up the GPS adapter and make sure NetStumbler sees it. Go to View -> Options... -> GPS
The default settings should be fine, but the port setting needs to be changed as needed for your system. You can check Device Manager to quickly determine what port you need:
   The GPS adapter is displayed as the Prolific USB-to-Serial Connection

Select the correct port and hit "OK". You should eventually see the "globe" icon on the bottom right of NetStumbler: 
So close! ;)

Once the globe shows up, we are ready to scan! Walk or drive around a bit  so that we have some data to work with. 

Ok, got some data? Click File -> Save, or hit ctrl+s. Save in a place you'll remember with a recognizable name. Now we want to convert the data to a Google Earth KML overlay. Get Google Earth here: http://earth.google.com Installed? Great!

There are quite a few options available to convert the file, but I found the easiest one for me to use is at gpsvisualizer.com. Just click on one of the "Choose File" buttons on the left, and then make sure that the output format on the right is set to "Google Earth KML".  Hit "Draw Map" and let it compute! A new page should open up where you can save the xml file to your computer. Now that we've got the goods, you can either double click the file or open it from within Google Earth. You should see something like this:
This is from one of my many trips up 99

That's it! Do what you will with your new map! I plan on doing something similar using Linux and Kismet in the near future. Let me know if something doesn't work or if you have any suggestions, feedback is always welcome!

Upside Down Images Prank

The other day my fiancee covered up my mouse sensor with a sticky note and then lurked around my computer to see how long it would take me to figure it out when I got home from work. Once I noticed what she had done, the first thing I thought was "well of course, this means war!" Time to break out the ole bag o' computer pranks!

First, I pulled the old take-a-screenshot-of-the-desktop-and-set-it-as-the-background, but that just didn't seem good enough. (Plus she figured it out in about 15 seconds.) So I knew I had to break out the big guns. I remembered seeing a prank a while back ago about setting up a proxy server to mess with images on websites, and that seemed like the perfect weapon for this scenario.

I got the idea from here: http://www.ex-parrot.com/pete/upside-down-ternet.html
There are a couple of other pranks on there that are pretty cool. Anyway, the site gives the script nessecary to flip the images, but it dosen't give a novice squid user (not the tasty calamari type) intructions on how to apply it! Being a squid noob, I had to do a few more searches to familiarize myself with the process. I found this site: https://help.ubuntu.com/community/UpUbside-Down-TernetHowTo but it didn't give me a working system, so I figured I would write up a sure-fire way for this to work quickly.

For my project, I used a Ubuntu 9.10 server, mostly because I already had a virtual machine installed with almost nothing on it. Also, adding software tends to be quick and easy on ubuntu. Any linux distro will work, but the steps for adding and configuring software will vary. Windows will work as well, but I don't have a windows machine I want to fool around with (i.e. break).

I should mention that I am not using a transparent proxy since I'm assuming you have access to your victim's computer, meaning that the proxy must be set in the web browser. Also, it's probably a good idea to disable the firewall on the server computer. With Ubuntu server, the command is "service ufw stop"

Ok, so once Ubuntu is up and running, bust open the terminal and type:
sudo apt-get install squid

While we are installing things, might as well make sure Apache 2 and imagemagick are installed:
sudo apt-get install  apache2 imagemagick

Make sure apache is working by opening Firefox and going to http://localhost and you should get a "It Works!" page. Run "/etc/init.d/apache2 start" if it doesn't work.

Now that we have all the software installed and apache is running, we need to configure squid. The squid configuration file is in /etc/squid/squid.conf. Open that up with root access:
sudo gedit /etc/squid/squid.conf 

The squid conf file is HUGE! It's a really powerful program, and we are just going to scratch the surface. Search for "TAG: acl" and scroll down to the uncommented lines. You need to add in something like:
acl two_ten src 192.168.210.0/24

My network uses 210.0, you need to adjust to whatever fits your requirements. http://www.subnet-calculator.com/ is a nice site to figure out what network options to use.

Once the acl line has been added scroll down to the "TAG: http_access" section and add:
http_access allow twoten_network

Save the file, but don't close it yet and restart squid:
sudo /etc/init.d/squid restart

Hopefully an "[OK]" shows up. Open up Firefox and the proxy needs to be configured.

 Edit->Preferences->Advanced->Network tab->Settings

3128 is the default port for squid. After applying the settings, try to browse to a website. If the site comes up normally, hooray! Almost done!

So now that squid is working normally, it's time to setup the image flipping trickery. First, apache needs a directory to store the images in with the correct permissions:
sudo mkdir /var/www/images
sudo chown www-data:www-data /var/www/images
sudo chmod 755 /var/www/images

Now add Apache to the proxy group:
sudo usermod -aG proxy www-data

Restart Apache:
sudo /etc/init.d/apache2 restart

 Time to use the script provided at http://www.ex-parrot.com/pete/upside-down-ternet.html. Fire up gedit and paste the following:
Edit: just noticed that the sides of the below code are not viewable, however you can copy and paste them into a word processor.

#!/usr/bin/perl
$|=1;
$count = 0;
$pid = $$;
while (<>) {
        chomp $_;
        if ($_ =~ /(.*\.jpg)/i) {
                $url = $1;
                system("/usr/bin/wget", "-q", "-O","/var/www/images/$pid-$count.jpg", "$url");
                system("/usr/bin/mogrify", "-flip","/var/www/images/$pid-$count.jpg");
                print "http://127.0.0.1/images/$pid-$count.jpg\n";
        }
        elsif ($_ =~ /(.*\.gif)/i) {
                $url = $1;
                system("/usr/bin/wget", "-q", "-O","/var/www/images/$pid-$count.gif", "$url");
                system("/usr/bin/mogrify", "-flip","/var/www/images/$pid-$count.gif");
                print "http://127.0.0.1/images/$pid-$count.gif\n";

        }
        else {
                print "$_\n";;
        }
        $count++;
}


If you compare this script to the one on the original page you'll notice I changed the path to the image directory on the lines that start with "system." The script will work with no editing if you used the quoted commands above to create the images directory.  
Save the script as flip.pl in /usr/local/bin. Add permissions:
sudo chmod 755 /usr/local/bin/flip.pl

Add the following to squid.conf
url_rewrite_program /usr/local/bin/flip.pl

Now save and close squid.conf
Change the permissions on the script:
sudo chmod 755 /usr/local/bin/flip.pl

Restart squid and apache:
sudo /etc/init.d/apache2 restart
sudo /etc/init.d/squid restart

Done! Open up a webpage and you should see something like this:

Notice that only .gif and .jpg images are flipped

Since this walkthrough is not using transparent mode, now the victim's computer must be configured. The proxy is configured the same way, but in windows the path may be a little different. For example using Firefox 3.6 in Windows XP, the path is:
Tools->Options->Advanced->Network>Settings

Now all you have to do is be close by to see your victim's reaction!

Let me know if any of the above doesn't work or if you have any other awesome tricks. Also, I'm probably going to write up some instructions on how to do this in transparent mode for confusion on a larger scale.


As always, feedback is welcome.

Upgrading Gentoo using Emerge

A few days ago, for whatever reason, I had the insane urge to upgrade all the software on my Gentoo system to the latest version. I still havent gotten around to compiling the latest kernel that came with the update (2.6.33), mostly because I've forgotton what what hardware I have and I haven't been having any problems with my current kernel (2.6.31).
Things actually went smoothly for the most part, the process only got hung up on compiling and installing Virtual Box. I figured I wouldn't mess around with it because I'm running a Windows XP virtual machine for work and I don't want to screw that up.

I started with syncing emerge:
sudo emerge --sync
and then started the update:
sudo emerge -av --update world --deep
After confirming the upgrade, I let it compile overnight. Unfortunately, I didn't use the "--keep-going" option so the job stopped when it had problems with Virtual Box. I used the "--skip-first" option to successfully complete the rest.

So once that was all finished, I ran etc-update, and crap! 31 config files need to be updated! Mind numbing...
I got to work merging the files that I knew had custom changes in them. After a while, the -3 option was looking really tempting (auto-merge files with new copy). I finally gave in and used it with about 15 files left, and woohoo! Mundane file editing over!

Everything seemed great until I rebooted and I had no internet. Some quick troubleshooting revealed that I was receiving a dhcp address, but no DNS servers, meaning I was able to ping internet IP addresses, but not their names.

A nice little side effect of not being able to resolve names is my time was off, because my ntp client couldn't resolve pool.ntp.org. A temporary fix is really easy, just open up /etc/resolv.conf and add some name servers.

sudo nano /etc/resolv.conf
Then add:
nameserver 208.67.220.220
(OpenDNS)

Once done, I was immediately able to browse the web and sync my time, but why did it happen in the first place? To add to the confusion, every time I reboot the computer, dhcp overwrites the resolv.conf file with a blank file, meaning I have to add the DNS again!
Well, it turns out to be my mistake. I took a look at /etc/conf.d/net and noticed that I had set up the machine for a static IP, but dhcp was also starting at boot, overwriting the file. I'm actually not too sure how it was working before the update, but to fix it I just ended up setting it to full dhcp. After setting that, I rebooted and presto! Internet with no tweaks!

Setting up Amarok Media Player

Now that I have a bunch of new audio files, I wanted to be able to organize and play them in an efficient way. I've heard that Amarok is a really nice audio player, similar to iTunes but a little more powerful. Also, a nice feature is that you can store your music library information in MySQL database, making it quicker than other audio players, particularly if you have a very large music library.

Since I know amarok uses mysql, and it isn't installed on my system, I ran
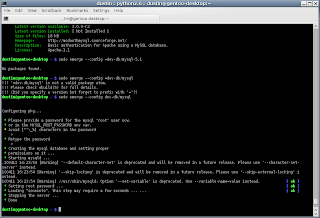
sudo emerge -av mysql

When it completed installing, I ran
sudo emerge --config dev-db/mysql

(Found on the Gentoo MySQL Guide)
This allowed me to set up the root password.


Checked to make sure it starts normally with
sudo /etc/init.d/mysql start

When it started normally, I added it to the boot sequence with
sudo rc-update add mysql default

Now that MySQL is installed and running, it's time to install Amarok:
sudo emerge -av amarok

Once Amarok was done compiling and installing, I opened it up from the application menu, but nothing happened... When opening from a terminal window I got the following error:

"amarok: error while loading shared libraries: libmysqlclient.so.15: cannot open shared object file: No such file or directory"
I went ahead and ran revdep-rebuild:
sudo revdep-rebuild

to see if that would fix the problem. It's generally one of the first things to try when running into a missing dependency on Gentoo. It scans for missing dependencies and re-compiles files as needed. Missing or broken dependencies are an unfortunate scenario that occasionally comes up with Gentoo. You wouldn't normally see such issues on a binary based distro like Ubuntu or Fedora.

Once the rebuild finished, I ran
sudo etc-update

and replaced the old sql conf file.
After that, I started up Amarok from the application menu, and success! It opened up normally!
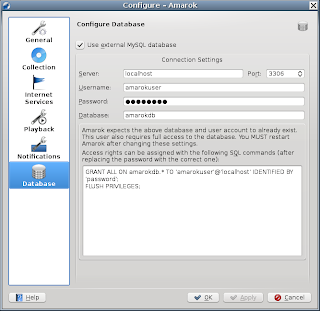
Actually it opened with the following dialog showing:


Pressing OK brings the following screen:

This was expected, now we just need to create the SQL database, username, and password as defined in the configuration window. Start with:
mysql -uroot -p mysql

Then type in the password that was set up for root earlier.
Now that we are connected to mysql, we can create a new database with the following:
CREATE database amarokdb;

A "Query OK ..." will display if the command was successful.

We can add a new user with the following:
CREATE USER 'amarokuser'@'localhost' IDENTIFIED BY 'your_password';

You should use something other than "your_password" in the above command.
Again, we are looking for a "Query OK" to verify success.
Finally, we need to set permissions as indicated in the Amarok configuration window:
GRANT ALL ON amarokdb.* TO 'amarokuser'@'localhost' IDENTIFIED BY 'your_password';
FLUSH PRIVILEGES;

Use the password created earlier for "your_password"
The "Query OK" message should display after each command.
At this point, the MySQL database, user, and permission should be successfully created.

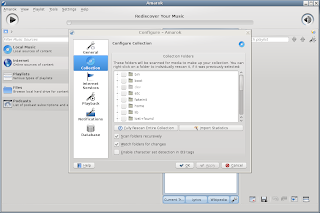
Now, back in the Amarok Configure window, replace the password with the one that was created earlier and hit "Apply" or "OK." Then Amarok needs to be completely exited and then reopened for the new database settings to be used. When Amarok is reopened, the following window shows up looking for all the music files.

Find wherever the music files are stored, hit OK and Amarok scans the directory. The files are now shown in the Local Collection on the main Amarok Screen. From here on out it should be somewhat simple to figure out how to add playlists and so on. Check out the User Manual for more info on operating Amarok.