VMWare Server Webaccess and Firefox 3.6.x

I've been having problems accessing the web interface of VMWare Server 2.0.2 running on CentOS 5.5 using Firefox. After putting in the page address, it appears to load, but then the screen stays blank. Using IE works fine. Frustrating!

Turns out the problem is with the way the vmware site uses SSL. To fix, follow the below steps:

1. In Firefox, type "about:config" in the address bar.
2. Type "ssl2" in the filter field.


"security.enable_ssl2" should be the first result. 
3. Doubleclick "security.enable_ssl2". The value should equal "true".

Restart Firefox, and enjoy managing your VMWare server!

Windows 7 Explorer as Administrator

This entry is mostly just out of spite. I wanted to open explorer as administrator to copy some files between hard drives. (It turns out I didn't really need to do that, but I digress.)
Shouldn't be too difficult right? I googled "windows explorer administrator" and came up with this site as the first hit. The description seemed very promising, but when I got to the site, I found you had to register/pay to see the solution.

Here is the extremely easy process to open Windows Explorer as Administrator in Windows 7:
1. Search for "explorer" in the windows menu search box.
2. Right-click "Windows Explorer" and select "Run as administrator"
3. Enter password if needed and enjoy.

That's it. Hope it helps someone.

Quick, Easy, Cheap PBX Setup using Skype

Looking to implement a phone and collaboration system for a small to medium sized organization? Open source software provides a proven, reliable solution for a fraction of the price of a standard enterprise level system. (Cisco...). You will need a working knowledge of Linux (or Google) for best results, as I won't be covering standard tasks such as changing an IP on Linux, etc.This post is meant as a proof-of-concept or for quick reference. The following instructions will provide an operational system able to make outgoing calls to standard landlines, however it is not a complete solution. Average user needs will call for something quite a bit more complex.

If you have an old box that can be used as a dedicated system, you can have a working voip (outgoing calls) and an IM communication system for less than $10 a month in fees. A very basic system (a few extensions and one SIP channel) can be set up in about 2-3 hours.
There are many good uses for such a system, not least of which is using SIP software on a mobile phone with 3G data access. The SIP client connects to your server over the internet, which then forwards the call though Skype.

In this walkthrough I will be focusing on creating a system very quickly with minimal configuration.

Materials
Hardware:
I used a virtual machine with 512MB Ram, 10GB HDD, and 3Ghz CPU for my setup. For a production system a physical machine would be preferable so that FXO or other interfaces can be easily added. Generally you need:
512MB RAM
Pentium III 1.2Ghz or higher
20GB+ Hard Drive

Software:
trixbox CE - trixbox CE is the free, fully open source version of the commercial version of trixbox. It utilizes Asterisk for PBX functionality and FreePBX for the web manager. After downloading and installing the ISO, (based on CentOS 5.5) the system is basically ready to go.

Openfire - Openfire is a comprehensive, scalable collaboration system. It has excellent integration features with Asterisk. I'm using Spark and it's SIP Phone plugin for a centralized IM and VoIP application.

Spark - The Java client for Openfire, developed by the same company (ignite realtime). Any XMPP client will work for the IM portion, however Spark has a SIP phone plugin allowing calls to be make directly from the app.

X-Lite - A nice softphone that is free and simple to configure and use. A drawback is it shows an ad everytime it's opened. Useful for testing extensions. Check sourceforge.net for free open source softphones.

Skype  for SIP - Very cheap service allowing incoming and outgoing calls to the outside world. Each channel (equivalent to a phone line) costs 6.95/month. An online number (phone number regular phones can call) costs an additional $6.30 a month per number.

Got it? Ok, lets start!

Install trixbox
Installing trixbox is about as straight forward as a Linux installation gets. Simply burn the ISO to a cd, boot, and let the installer do the rest of the work. Keep things simple and don't try to add it on to an existing installation. The default install will wipe your hard drive! The only input required is the root password. Reboot the system and it should be ready to go. The network will be configured with a DHCP address, so you will need to log in and check it with "ifconfig" or configure a static address as necessary.

Configure an Extension
Once installed, log into the web interface (http://ipaddress). The default admin login is:
User: maint 
Password: password
Check the top right corner to make sure the system is in admin mode. If not, click "switch." 
After successfully logging in, create a new extension. Click on the "PBX" menu and select "PBX Settings".

Click on "Extensions"

Keep the pull down menu on "Generic SIP Device" and click "Submit". The only required fields for the scope of this walkthrough are "User Extension", "Display Name", and "Secret".
Use a 3 digit number for the extension (200), and a name and password for the other fields.
After entering the proper information, click "Submit" on the bottom of the page.
You would think after clicking submit the process would be finished, but Asterisk still needs to be reloaded. Click the "Apply Configuration Changes" button on the top of the page:

Click "Continue with reload" and the extension should be ready to go.
Repeat the process with a second extension so a test call can be made.

Install a Softphone
On a Windows computer (XP, Vista, 7), install X-Lite. Right-click anywhere on the phone and select "SIP Account Settings" from the menu. If there is already an account in the list that comes up, click properties.
"Display Name" can be anything.
"User name" and "Authorization user name" should be the extension.
"Domain" should be the IP address of the trixbox machine.
The defaults for the rest of the fields will work for now.
When two extensions are configured on separate computers, dial an extension and verify everything is working.

Configure Skype for SIP
Configuring the Skype SIP connection is the most complicated part of the installation, mostly because it is still in "beta" and there is currently no documentation (that I could find).

  • Log onto skype.com and create an account if you don't already have one. 
  • Click on the "Business" link on the far right of the skype homepage and create a business account. You can associate it with an existing regular account if desired. 
  • Once in the "Skype Manager Dashboard" purchase some credit. $10 will be enough for our purposes. 
  • Click on the "Features" button near the top left of the page, and then click "Skype for SIP". Click "Create new profile" and give it a name. Take note of the username, password, and address that is generated.
  • Click on "Profile Settings" on the left, and then click on "Setup outgoing calls". The system will not let outgoing calls through unless there is credit on the line (even free local calls). Add the amount of credit desired. I allocated the remaining credit from the original $10 ($3.04).
An online number for incoming calls can be setup for additional $$$.

Configure the SIP Trunk in trixbox
Now that Skype is configured, the trunk on the trixbox machine can be configured. This is another part that has very little documentation available.

In the trixbox web interface, click on "Trunks" on the left, and then click "Add SIP trunk".

Under "General Settings" type the assigned skype username in the Outbound Caller ID field.

In "Outgoing Dialing Rules", input "NXXNXXXXXX". (area code plus 7 digit number)

Under "Outgoing Settings", give the trunk a name.
Use the following under "PEER Settings":
username=xxxxxx ; This is the Skype SIP User found in the authentication  area
secret=xxxxxxxx ; Skype SIP password
type=peer
qualify=yes
insecure=invite
host=sip.skype.com
fromdomain=sip.skype.com
disallow=all
allow=ulaw&gsm&alaw
context=from-trunk
fromuser=xxxxxx ; Skype SIP Username
Under "Registration" use:
username:password@sip.skype.com/username

Leave the "User Context" and "User Details" blank.

Configure an Outbound Route
This is the last step needed to place outgoing calls.
  • Click "Outbound Routes" on the left panel.
  • Give the route a name (skypeout or similar)
  • Enter "99|." in the "Dial Patterns" box. (Users will dial "99" to reach an outside line.)
  • Select the Skype SIP trunk that was created earlier in the "Trunk Sequence" area.
  • Submit the changes and then apply the configuration changes.
After the configuration has been applied to Asterisk, the system should be working. Try reaching an outside line from a softphone by dialing "99 1 xxx xxxx"
If it dosen't go through, make sure credit is applied in skype.
Check the output by running "asterisk -r -vvvv" on the server
At this point the phone system should be working correctly. Continue reading for Openfire setup.

Set up the Openfire Collaboration Server (Instant Messaging)
Now that the PBX is working with outgoing calls, the IM server can be configured.
  • Download Openfire to the server and start the installation (rpm -ivh openfire_*.rpm).
  • When the install is finished, log onto the admin console. (http://ipaddress:9090)
  • Complete the setup wizard. When asked for a database use the internal database.
After the setup wizard is up and running, create some new users.
  • Click the "Users/Groups" button on the menubar and then "Create New User" on the left.
  • Install Spark on a client computer. For the server enter the IP address of the trixbox/Openfire machine. Click connect the client should log on normally.
Install the SIP Phone Plugin for Openfire and Spark.
  • Open the Openfire web admin page and click the "Plugins" button on the top menubar.
  • Click "Available Plugins" on the Plugins page.
  • Locate "SIP Phone Plugin" and click the green install button on the right.
  • After the plugin is installed successfully, click the "Server" button on the menubar, and then click the "Phone" button on the sub-menubar.
  • Click "Add new phone mapping"
Enter the following:
XMPP username: openfire username
SIP username: asterisk extension
Authorization username: asterisk extension
Display Phone Number: Desired number
Password: password setup on trixbox
Server: IP address of trixbox machine
 Once all the data is in, hit create. The extension will be registered when the client installs the plugin and logs on. (next step)

Install the SIP Phone Plugin in Spark.
  • Open Spark, login with the user that has the mapped extension.
  • Click the "Spark" menu on the top left and select "Plugins"
  • Click the "Available Plugins" tab. Select the SIP Phone Plugin and click the green install button on the right. After it is finished installing, restart Spark.
When Spark starts back up, a new toolbar will be displayed with phone dialing tools. Assuming the extension mapping was configured correctly, the Spark client can now place calls in the same way the X-Lite client can.

That concludes the setup. Please post any problems or suggestions. Thanks!

Resuming an Interrupted SSH Session

If you ssh into remote *nix boxes with any sort of regularity, it's almost inevitble that at some point your connection is going to drop. If it happens while you are editing a file it can be a real pain to start from where you left off. In my case, I had an account on my school's Unix server but it would kick me off after about 5-10 minutes of inactivity. Talk about frustrating. 

Fortunately, the "screen" command let's you easily restart your session. 

Get Screen

Your distro probably already has screen built in. If you're using ubuntu and it's not there just type:
sudo apt-get install screen
For gentoo the command would be:
emerge -av app-misc/screen
Using Screen

Once it's installed usage is trivial. If you're only going to be using a single session, connect via ssh and type:
screen
If you get dissconnected, reconnect your ssh session and type:
screen -R
You will then enter the session where you left off.
You can check if there is an existing screen session by typing:
screen -ls
 If you want to use multiple sessions, you will need to name the sessions with a unique name.
screen -S session1
Then connect in the same way, but including the session name:
screen -R session1
 Those are the basics! Screen has more advanced features you can check out in the man page.

Installing Gentoo on an Apple G5

I was lucky enough to recently acquire an old dual 2.5Ghz G5 from my brother because he was no longer using it. Sweet! This is the first Mac I've used since the late 90's, and I have to say I'm really impressed with the quality of the case, components, and construction. The only drawback is that it's the last Apple to use the PowerPC processor architecture, meaning consumer software isn't really being developed for it anymore. :(

Since updated software for OS X on PPC is getting hard to find, I decided that a source based Linux distro could extend the life of the machine a little longer (debateable, some feel an OS like Debian has more support). Although to be honest, a more practical option would be to keep OS X and compile any Linux software I wanted for OS X. But what's the fun in that? I haven't really used OS X but I would definitely like to experiment with it, so my goal is to have a dual boot system with OS X and Gentoo Linux.

I don't have any experience with Linux on PPC (especially the bootloader), so I decided to take no chances and removed the hard drive with OS X on it and put in a spare 160GB sata drive I had, just to make sure I didn't ruin some data. (fdisk /dev/sda instead of /dev/sdb has been known to happen...)

This walkthrough is heavily inspired from the PPC Gentoo Handbook. I had to make a few modifications since I didn't want a fully 64 bit system and the regular PPC handbook won't work for a G5 if you follow it exactly.

Getting Gentoo

The Gentoo minimal install CD can be downloaded here: http://distfiles.gentoo.org/releases/ppc/current-iso/
This walkthrough was made using "install-powerpc-minimal-20091018.iso"
Burn the iso to a CD-R with a program like Iso Recorder, Nero, or K3B.

Booting from the Install CD

Insert the CD (you may have to boot into OS X to eject the drive without forcing it manually). Reboot and hold down the "c" key after the startup tone sounds.
If you did it right, some information and boot options will be displayed by yaboot. Type "G5" and hit enter to boot from the livecd. If the display is corrupted (I had some problems with the pcie Radeon) try rebooting and typing "G5 video=ofonly" at the prompt.
The livecd should detect the network interface and start dhcp automatically.
When it's finished booting, start ssh so we can install from a different computer.

passwd password (use your desired password)

/etc/init.d/sshd start

ifconfig

Take note of the ipaddress and open an ssh connection from another computer. From Linux:

ssh root@$IP_ADDRESS

Prepare the Hard Drive

This part can get a little tricky. The drive needs a minimum of 4 partitions (counting swap), 2 of which are not used by linux. We will use mac-fdisk to partition the drive. Since, I am installing to a separate drive I'm not going to worry about mac partitions.

mac-fdisk /dev/sda

Press "i" to wipe the drive and initialize it. Warning: All data will be lost!
After the drive has been initialized, press "b" and enter "2p" when asked for the start block. This installs the Apple_Bootstrap partition.
Now we need a swap. Press "c" and enter "3p" for the block. Enter "512M" or greater when asked for the size. Most people generally use twice the installed memory. Type "swap" when the name prompt appears.
Finally, the root partition. Press "c" and enter "4p" to select the starting root block. When the size prompt comes up, type "4p" again to use up all the remaining space. When asked for a name, enter "root."
Hit "w" to save the changes, and then "q" to exit.

Set the Time

Maybe it's already correct? Type "date" and verify. If not set the correct time and date:

date 051018002010 (mmddhhmmyyyy - Month Day Hour Minute Year)

Create the Filesystems

I used ext3, a nice solid file system with plenty of support. Yaboot will not boot from ext4, so if you want to use it you will need a separate boot partition.

mke2fs -j /dev/sda4

Create and activate the swap partition:
mkswap /dev/sda3

swapon /dev/sda3
Mount the root partition so we can install Gentoo on it:

mount /dev/sda4 /mnt/gentoo

Download and Install the Latest System Files

Move to /mnt/gentoo to make things easier.

cd /mnt/gentoo

Now navigate to the Gentoo mirrors to download the latest stage 3 file:

links distfiles.gentoo.org

Navigate to releases/ppc/current-stage3 and download:

stage3-ppc64-32ul-*.tar.bz2

Unpack it:
tar xvpjf stage3-ppc64-32ul*.tar.bz2

Now portage needs to be downloaded and installed/updated.

links distfiles.gentoo.org

Navigate to releases/snapshots/current and download:

portage-latest.tar.bz2

Now install it:

tar xvjf portage-latest.tar.bz2 -C /mnt/gentoo/usr

It might take a while to finish decompressing.

Compile Options

We need to optimize compiling for the G5 processor.

nano /mnt/gentoo/etc/make.conf

Here's what I have in my make.conf:

CHOST="powerpc-unknown-linux-gnu"
CFLAGS="-O2 -pipe -mcpu=970"
MAKEOPTS="-j3"
VIDEO_CARDS="radeon"

Note since the 32bit User Land is being used, there is no 64 after the powerpc above.

Chroot to the New Installation

Copy over the DNS info so that the internet is accessible:

cp -L /etc/resolv.conf /mnt/gentoo/etc
Now /proc and /dev needs to be mounted:

mount -t proc none /mnt/gentoo/proc

mount -o bind /dev/ /mnt/gentoo/dev/

chroot /mnt/gentoo /bin/bash

env-update

source /etc/profile

You should now be inside the new Gentoo installation. Portage should already be up to date, but you can run "emerge --sync" to make sure.
List a profile:

eselect profile list

Select your desired profile:

eselect profile set 9 (9 is the 64/32 gnome desktop that I used)
Set the Timezone

Find your timezone with "ls /usr/share/zoneinfo"
Select it by "cp /usr/share/zoneinfo/America/Los_Angeles /etc/localtime"
You can see that I'm using PST time. Adjust to your needs.
While we are messing the time, might as well configure the clock.

nano /etc/conf.d/clock

Uncomment the line with "Factory" in it and replace "Factory with your zone/city. For me, that's "America/Los_Angeles"

Install and Compile the Kernel

For simplicity, I'm sticking with gentoo-sources.

emerge gentoo-sources

Now change directories:

cd /usr/src/linux

Configure the default settings for the G5:

make g5_defconfig

I've found the above command is all you need for a bootable system. Of course you should probably configure to your liking with "make menuconfig"
Now the tricky part! The G5 needs a 64bit kernel to boot, but we are using a 32bit User Land! This means we have to cross-compile the kernel. Just typing "make" will not work! Use the following:

CROSS_COMPILE="powerpc64-unknown-linux-gnu-" make && make modules_install

Wait until it's finished compiling (probably about 30 minutes) and then copy the kernel to /boot:

cp vmlinux /boot/kernel-2.6.32

Getting close! Bet you thought I forgot about fstab. Think again!
Edit fstab:

nano /etc/fstab

Make sure to comment out the line for the /boot partition
Change "ROOT" to "sda4"
Change "SWAP" to "sda3"
The default settings are configured for an ext3 /root and swap on sda3.

Set Hostname and Network

nano /etc/conf.d/hostname

HOSTNAME="yourcomputer"
Now emerge dhcp:

emerge dhcpcd

If you are using DHCP on your network, you most likely don't need to configure anything else. Gentoo will automatically get an address on boot.

Set the Root Password

This one is kinda important ;)

passwd

System Tools

To speed things up, I'm only installing a System Logger.

emerge syslog-ng

Now make sure it starts on boot:

rc-update add syslog-ng default

Bootloader!

The bootloader was one of the most confusing steps to me as I was used to grub.
Since we are using 32bit UL, we need regular yaboot (NOT yaboot-static)
emerge yaboot
Now, either exit out of the chroot, or just start a seperate ssh session to the live cd and run:
yabootconfig --chroot /mnt/gentoo

It's important you run the above command out of the chroot environment or it will error out.
If the fstab is configured correctly there should be no problems.The bootstrap should be /dev/sda2.
When it asks for a kernel type: "/boot/kernel-2.6.32" (or whatever you named your kernel)
Leave initfs blank.

When it's done, we are ready to reboot! Unmount /mnt/gentoo/proc /mnt/gentoo/dev/ and /mnt/gentoo
then reboot.
If all goes well, gentoo will boot to the command prompt!
From here on out, software can be instaled using standard emerge commands. After emerging gnome, a few other apps, and fiddeling with the appearence (thanks gnome-look.org), I ended up with this:


Conclusion
I actually had some fun working through this project, but I have to say I probably won't be using it as my main desktop. The system is noticeably snappier than OS X, but that may be because I have no 3D effects turned on. The main drawback is closed source software that isn't precompiled for PPC (Adobe Flash, Skype) won't work, which greatly reduces the usability of the system. (Maybe HTML5 will change that?)The OS X drive will be going back in soon and I'll experiment with compiling linux software in OS X. Oh well, it was a fun, project.

Installing Masked Packages in Gentoo

I've been avoiding installing masked packages for quite some time because I didn't know how to do it properly. I finally broke down and looked up the correct procedure.
Here is the improper way, which will either break your system or make it unstable if used sytemwide:

/etc/make.conf
ACCEPT_KEYWORDS="~x86"
-The x86 variable should be changed depending on your achitecture (x64, ppc, ppc64, etc)

Now, here is the "correct" way to unmask packages.
  • Edit or create the file "/etc/portage/package.keywords" -The file needs to be created if you have never accessed it before. 
  • Input the following, depending on the package. I'll use gnome-do as an example: "gnome-extra/gnome-do **"
In the future, use the command line without a text editor:
echo "gnome-extra/gnome-do **" >> /etc/portage/package.keywords
That's it!

Mapping Wifi Networks on Google Earth

Something that has intrigued me since I was young was the thought of all the radio waves filling the air at any given moment, filled with information that can be translated using a special receiver. It seems amazing to me how much information is surrounding us, yet we are completely oblivious to it!

My curiosity of RF signals led me to recently look into mapping the local wifi access points surrounding my apartment, and from there it advanced to the point where I was taking my laptop wherever I went so I could get a map of APs. The process is surprisingly easy, but unfortunately it relies on a third party website. The website works great for now, but who knows how long it will be around. I'm going to cover the easy way right now, and in a future post I plan to cover a method that uses all internal tools.

There are only two pieces of hardware needed for this project:
  • A laptop with a wifi interface - I used an EeePC 1000h with windows XP installed
  • A GPS adapter for the laptop - I used BU-353 from USGlobalSat. You can find them online for about $30-40 new.
The GPS adapter and netbook
Ready to go! I usually configure the netbook to stay on when the lid is closed.

Once you have the hardware, the software needs to be installed and configured. Since we are using Windows XP, NetStumbler  is a great tool that is very simple to use, downloadable here: http://www.stumbler.net  (Not to be confused with netstumbler.com)

After it's done installing, open it up and take a look at what's around you.
APs visible from my apartment

Now hook up the GPS adapter and make sure NetStumbler sees it. Go to View -> Options... -> GPS
The default settings should be fine, but the port setting needs to be changed as needed for your system. You can check Device Manager to quickly determine what port you need:
   The GPS adapter is displayed as the Prolific USB-to-Serial Connection

Select the correct port and hit "OK". You should eventually see the "globe" icon on the bottom right of NetStumbler: 
So close! ;)

Once the globe shows up, we are ready to scan! Walk or drive around a bit  so that we have some data to work with. 

Ok, got some data? Click File -> Save, or hit ctrl+s. Save in a place you'll remember with a recognizable name. Now we want to convert the data to a Google Earth KML overlay. Get Google Earth here: http://earth.google.com Installed? Great!

There are quite a few options available to convert the file, but I found the easiest one for me to use is at gpsvisualizer.com. Just click on one of the "Choose File" buttons on the left, and then make sure that the output format on the right is set to "Google Earth KML".  Hit "Draw Map" and let it compute! A new page should open up where you can save the xml file to your computer. Now that we've got the goods, you can either double click the file or open it from within Google Earth. You should see something like this:
This is from one of my many trips up 99

That's it! Do what you will with your new map! I plan on doing something similar using Linux and Kismet in the near future. Let me know if something doesn't work or if you have any suggestions, feedback is always welcome!

Upside Down Images Prank

The other day my fiancee covered up my mouse sensor with a sticky note and then lurked around my computer to see how long it would take me to figure it out when I got home from work. Once I noticed what she had done, the first thing I thought was "well of course, this means war!" Time to break out the ole bag o' computer pranks!

First, I pulled the old take-a-screenshot-of-the-desktop-and-set-it-as-the-background, but that just didn't seem good enough. (Plus she figured it out in about 15 seconds.) So I knew I had to break out the big guns. I remembered seeing a prank a while back ago about setting up a proxy server to mess with images on websites, and that seemed like the perfect weapon for this scenario.

I got the idea from here: http://www.ex-parrot.com/pete/upside-down-ternet.html
There are a couple of other pranks on there that are pretty cool. Anyway, the site gives the script nessecary to flip the images, but it dosen't give a novice squid user (not the tasty calamari type) intructions on how to apply it! Being a squid noob, I had to do a few more searches to familiarize myself with the process. I found this site: https://help.ubuntu.com/community/UpUbside-Down-TernetHowTo but it didn't give me a working system, so I figured I would write up a sure-fire way for this to work quickly.

For my project, I used a Ubuntu 9.10 server, mostly because I already had a virtual machine installed with almost nothing on it. Also, adding software tends to be quick and easy on ubuntu. Any linux distro will work, but the steps for adding and configuring software will vary. Windows will work as well, but I don't have a windows machine I want to fool around with (i.e. break).

I should mention that I am not using a transparent proxy since I'm assuming you have access to your victim's computer, meaning that the proxy must be set in the web browser. Also, it's probably a good idea to disable the firewall on the server computer. With Ubuntu server, the command is "service ufw stop"

Ok, so once Ubuntu is up and running, bust open the terminal and type:
sudo apt-get install squid

While we are installing things, might as well make sure Apache 2 and imagemagick are installed:
sudo apt-get install  apache2 imagemagick

Make sure apache is working by opening Firefox and going to http://localhost and you should get a "It Works!" page. Run "/etc/init.d/apache2 start" if it doesn't work.

Now that we have all the software installed and apache is running, we need to configure squid. The squid configuration file is in /etc/squid/squid.conf. Open that up with root access:
sudo gedit /etc/squid/squid.conf 

The squid conf file is HUGE! It's a really powerful program, and we are just going to scratch the surface. Search for "TAG: acl" and scroll down to the uncommented lines. You need to add in something like:
acl two_ten src 192.168.210.0/24

My network uses 210.0, you need to adjust to whatever fits your requirements. http://www.subnet-calculator.com/ is a nice site to figure out what network options to use.

Once the acl line has been added scroll down to the "TAG: http_access" section and add:
http_access allow twoten_network

Save the file, but don't close it yet and restart squid:
sudo /etc/init.d/squid restart

Hopefully an "[OK]" shows up. Open up Firefox and the proxy needs to be configured.

 Edit->Preferences->Advanced->Network tab->Settings

3128 is the default port for squid. After applying the settings, try to browse to a website. If the site comes up normally, hooray! Almost done!

So now that squid is working normally, it's time to setup the image flipping trickery. First, apache needs a directory to store the images in with the correct permissions:
sudo mkdir /var/www/images
sudo chown www-data:www-data /var/www/images
sudo chmod 755 /var/www/images

Now add Apache to the proxy group:
sudo usermod -aG proxy www-data

Restart Apache:
sudo /etc/init.d/apache2 restart

 Time to use the script provided at http://www.ex-parrot.com/pete/upside-down-ternet.html. Fire up gedit and paste the following:
Edit: just noticed that the sides of the below code are not viewable, however you can copy and paste them into a word processor.

#!/usr/bin/perl
$|=1;
$count = 0;
$pid = $$;
while (<>) {
        chomp $_;
        if ($_ =~ /(.*\.jpg)/i) {
                $url = $1;
                system("/usr/bin/wget", "-q", "-O","/var/www/images/$pid-$count.jpg", "$url");
                system("/usr/bin/mogrify", "-flip","/var/www/images/$pid-$count.jpg");
                print "http://127.0.0.1/images/$pid-$count.jpg\n";
        }
        elsif ($_ =~ /(.*\.gif)/i) {
                $url = $1;
                system("/usr/bin/wget", "-q", "-O","/var/www/images/$pid-$count.gif", "$url");
                system("/usr/bin/mogrify", "-flip","/var/www/images/$pid-$count.gif");
                print "http://127.0.0.1/images/$pid-$count.gif\n";

        }
        else {
                print "$_\n";;
        }
        $count++;
}


If you compare this script to the one on the original page you'll notice I changed the path to the image directory on the lines that start with "system." The script will work with no editing if you used the quoted commands above to create the images directory.  
Save the script as flip.pl in /usr/local/bin. Add permissions:
sudo chmod 755 /usr/local/bin/flip.pl

Add the following to squid.conf
url_rewrite_program /usr/local/bin/flip.pl

Now save and close squid.conf
Change the permissions on the script:
sudo chmod 755 /usr/local/bin/flip.pl

Restart squid and apache:
sudo /etc/init.d/apache2 restart
sudo /etc/init.d/squid restart

Done! Open up a webpage and you should see something like this:

Notice that only .gif and .jpg images are flipped

Since this walkthrough is not using transparent mode, now the victim's computer must be configured. The proxy is configured the same way, but in windows the path may be a little different. For example using Firefox 3.6 in Windows XP, the path is:
Tools->Options->Advanced->Network>Settings

Now all you have to do is be close by to see your victim's reaction!

Let me know if any of the above doesn't work or if you have any other awesome tricks. Also, I'm probably going to write up some instructions on how to do this in transparent mode for confusion on a larger scale.


As always, feedback is welcome.

Upgrading Gentoo using Emerge

A few days ago, for whatever reason, I had the insane urge to upgrade all the software on my Gentoo system to the latest version. I still havent gotten around to compiling the latest kernel that came with the update (2.6.33), mostly because I've forgotton what what hardware I have and I haven't been having any problems with my current kernel (2.6.31).
Things actually went smoothly for the most part, the process only got hung up on compiling and installing Virtual Box. I figured I wouldn't mess around with it because I'm running a Windows XP virtual machine for work and I don't want to screw that up.

I started with syncing emerge:
sudo emerge --sync
and then started the update:
sudo emerge -av --update world --deep
After confirming the upgrade, I let it compile overnight. Unfortunately, I didn't use the "--keep-going" option so the job stopped when it had problems with Virtual Box. I used the "--skip-first" option to successfully complete the rest.

So once that was all finished, I ran etc-update, and crap! 31 config files need to be updated! Mind numbing...
I got to work merging the files that I knew had custom changes in them. After a while, the -3 option was looking really tempting (auto-merge files with new copy). I finally gave in and used it with about 15 files left, and woohoo! Mundane file editing over!

Everything seemed great until I rebooted and I had no internet. Some quick troubleshooting revealed that I was receiving a dhcp address, but no DNS servers, meaning I was able to ping internet IP addresses, but not their names.

A nice little side effect of not being able to resolve names is my time was off, because my ntp client couldn't resolve pool.ntp.org. A temporary fix is really easy, just open up /etc/resolv.conf and add some name servers.

sudo nano /etc/resolv.conf
Then add:
nameserver 208.67.220.220
(OpenDNS)

Once done, I was immediately able to browse the web and sync my time, but why did it happen in the first place? To add to the confusion, every time I reboot the computer, dhcp overwrites the resolv.conf file with a blank file, meaning I have to add the DNS again!
Well, it turns out to be my mistake. I took a look at /etc/conf.d/net and noticed that I had set up the machine for a static IP, but dhcp was also starting at boot, overwriting the file. I'm actually not too sure how it was working before the update, but to fix it I just ended up setting it to full dhcp. After setting that, I rebooted and presto! Internet with no tweaks!

Setting up Amarok Media Player

Now that I have a bunch of new audio files, I wanted to be able to organize and play them in an efficient way. I've heard that Amarok is a really nice audio player, similar to iTunes but a little more powerful. Also, a nice feature is that you can store your music library information in MySQL database, making it quicker than other audio players, particularly if you have a very large music library.

Since I know amarok uses mysql, and it isn't installed on my system, I ran
sudo emerge -av mysql

When it completed installing, I ran
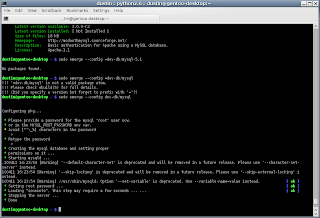
sudo emerge --config dev-db/mysql

(Found on the Gentoo MySQL Guide)
This allowed me to set up the root password.


Checked to make sure it starts normally with
sudo /etc/init.d/mysql start

When it started normally, I added it to the boot sequence with
sudo rc-update add mysql default

Now that MySQL is installed and running, it's time to install Amarok:
sudo emerge -av amarok

Once Amarok was done compiling and installing, I opened it up from the application menu, but nothing happened... When opening from a terminal window I got the following error:

"amarok: error while loading shared libraries: libmysqlclient.so.15: cannot open shared object file: No such file or directory"
I went ahead and ran revdep-rebuild:
sudo revdep-rebuild

to see if that would fix the problem. It's generally one of the first things to try when running into a missing dependency on Gentoo. It scans for missing dependencies and re-compiles files as needed. Missing or broken dependencies are an unfortunate scenario that occasionally comes up with Gentoo. You wouldn't normally see such issues on a binary based distro like Ubuntu or Fedora.

Once the rebuild finished, I ran
sudo etc-update

and replaced the old sql conf file.
After that, I started up Amarok from the application menu, and success! It opened up normally!
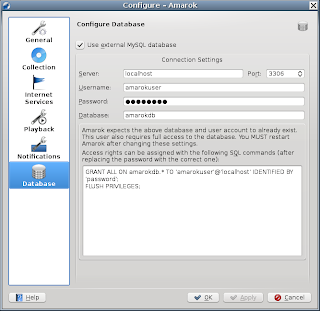
Actually it opened with the following dialog showing:


Pressing OK brings the following screen:

This was expected, now we just need to create the SQL database, username, and password as defined in the configuration window. Start with:
mysql -uroot -p mysql

Then type in the password that was set up for root earlier.
Now that we are connected to mysql, we can create a new database with the following:
CREATE database amarokdb;

A "Query OK ..." will display if the command was successful.

We can add a new user with the following:
CREATE USER 'amarokuser'@'localhost' IDENTIFIED BY 'your_password';

You should use something other than "your_password" in the above command.
Again, we are looking for a "Query OK" to verify success.
Finally, we need to set permissions as indicated in the Amarok configuration window:
GRANT ALL ON amarokdb.* TO 'amarokuser'@'localhost' IDENTIFIED BY 'your_password';
FLUSH PRIVILEGES;

Use the password created earlier for "your_password"
The "Query OK" message should display after each command.
At this point, the MySQL database, user, and permission should be successfully created.

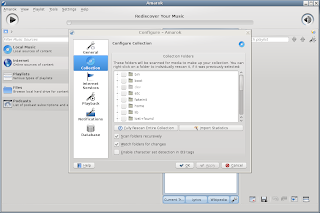
Now, back in the Amarok Configure window, replace the password with the one that was created earlier and hit "Apply" or "OK." Then Amarok needs to be completely exited and then reopened for the new database settings to be used. When Amarok is reopened, the following window shows up looking for all the music files.

Find wherever the music files are stored, hit OK and Amarok scans the directory. The files are now shown in the Local Collection on the main Amarok Screen. From here on out it should be somewhat simple to figure out how to add playlists and so on. Check out the User Manual for more info on operating Amarok.

Ripping CDs using K3B

If you read my last post, you know I was on a quest to rip some CDs but was delayed by some hardware problems. Now that those are resolved, I thought I would document the process I used to actually rip the music, using my Gentoo desktop.

I had never ripped CDs using Linux (Who still uses CDs anyway?) so I started searching for an easy to use open source ripper. I have both gtk and kde libraries installed on my system, so it doesn't really matter what desktop the app is built for. One of the most popular Linux applications is Grip. I installed it on my system using "emerge -av grip" I did a test run with it but the interface wasn't very intuitive and I'm very impatient. (Who has time to RTFM?!)
Grip GUI

It seemed easy enough to use with the default settings, but one of my requirements is to rip the tracks using the lossless FLAC audio codec, and I couldn't easily figure out how to do that with Grip.

With Grip out, due to impatience, I kept searching and found K3B. I have used K3B in the past for burning CDs and DVDs but I was unaware that it ripped CDs. I installed K3B using "emerge -av k3b". The install took a while because there were quite a few dependencies my system needed to compile and install. When the installation was complete, I fired it up, and after the fancy splash screen disappeared, I easily found the ripping section of the program using the "More Actions" button on the main screen. I popped in the first CD, a Beethoven compilation, and was delighted to see that it automatically recognized it and downloaded the album and track info from CDDB.

Track info auto populated from CDDB

Selected the "Flac" filetype and custom target folder

Once I had the above settings configured, I hit "Start Ripping" and BAM! Music encoded with FLAC after a few minutes. Using the badass program Amarok (covered in next post) I was able to listen to the ripped music.


Power Supply Troubleshooting and Making a PCIe Video Card Power Cable

So I've been using my computer quite a while now without any type of CD drive attached, and had no need for one until recently. I have been using Gentoo Linux exclusively for about 3 months, but have had it installed for about 6. one of the main reasons for the move to Gentoo was my Windows 7 RC install was getting close to expiring (MS changed the dates... lame). One of the cool things about Gentoo is that all software is compiled for the local system, rather than using binaries, which can give speed increases and also allows for not installing components that are not needed. Portage makes adding software a simple task using the emerge command. If software isn't available through portage or elsewhere on the internet, a USB flash drive easily takes the place of optical media..

Anyway, Amanda and I have been trying to decide on what music we want playing at our wedding so I figured it would make things easier if we ripped the CDs we liked to the computer for easy listening. Good idea in theory, right?
I had an old DVD drive that has been collecting dust for who knows how long, so I figured I would hook it up and I would be ripping CDs in no time. The installation went smoothly… Attach the IDE ribbon cable and set the jumper to master. Pretty simple stuff. Unfortunately, the process was about to turn sour.
After closing the case back up, I hit the power button and was greeted with silence. Hearing nothing after pressing the power button is probably one of the most dreaded problems a computer technician faces. No beep codes, no fans whirring, just nothing. I quickly opened the case back up and unplugged the DVD drive and hit the power button again. Nothing. By this point I was starting to feel a bit anxious. I removed everything from the motherboard except for the processor and tried again. Nothing. Arrgh, what the heck happened?!?

At this point the problem can really be only a few things: The battery on the motherboard had died, the motherboard itself had died, the power button had broke, or the power supply had died. I wanted to check out the power button first, because it tends to be a little sticky and sometimes requires a little finessing. I removed the front cover and clipped the green and white wires leading to the power button. I stripped a little bit of insulation off, exposing the wires and then shorted them. Nothing. Well, that rules out the power switch being broken. By this time we had to run some errands in town, so I figured I would take the BIOS battery with me and get a replacement. I stopped by radio shack and found a replacement for about $5. I wasn't very optimistic that the battery was the problem. It was a long shot at best, but it's a heck of a lot cheaper than a new power supply or motherboard.
When we got back home I changed out the battery and attempted to power on the computer and was greeted with… nothing. That ruled out the cheap fix. Now it was either the motherboard itself or the power supply. A new replacement cost for those might as well be $1,000,000 as we are saving for the wedding and every dollar is closely accounted for. Feeling a little desperate, I sent out some pleas on Facebook and on my work email, begging for spare parts.

While waiting for responses to my distress call, I remembered I had an old Antec 450 truepower powersupply in the closet. Great! I hooked it up to the motherboard, feeling a bit nervous about the much larger main power connector on the motherboard that left some open leads. Once hooked up, I pressed the power button and… success!! Well, sort of. The fans went on and the computer posted, but there was no video. Unfortunately, the old power supply did not have a PCIe power connector, meaning the video card was not fully powered up. At least I knew it was a problem with the power supply and not the mother board…
I did a quick google search and found that adapters to hook up the PCIe video card to my old power supply did exist, but none of the local shops had them, meaning I would have to wait for a cable to be shipped. That seemed unacceptable, so I did some research on the power connector and found out there is nothing special about power input; it's just 12 volts with ground wires, the same as the rest of the components. It just uses a different connector.

When I saw that it uses standard 12v, I figured I could make my own adapter using the cable from the broken power supply, and a Y adapter cable I had. Here's what I started with:


Y Adapter


PCIe cable
Next, I cut off the rubber coating to see how the wires were arranged.


You can see that two wires are just spliced together.
Next, I cut off the end farthest from the connector that plugs into the PCIe card, and also cut off the red wires on the Y adapter. I made sure to tape up the cut wires to avoid shorts.


Cut wires
Next, I stripped the insulation off all the wires and spliced them together, yellow to yellow and black to black.


I then taped up the wires individually to avoid shorts, and finally covered up all of them to tidy things up.


Individual splices insulated


Final product.
I excitedly hooked the new (old) power supply and attached my custom cable to it and the video card. Holding my breath, I pressed the power button, praying the whole thing wouldn't blow up. After pressing the button, I heard the computer power up, and the monitor lit up and displayed the boot sequence.


Yay!
The startup sequence hung because the BIOS time was reset, causing the hard drive to have write times in the future. Once the clock was updated, the computer booted normally. Thus ends the saga of the busted power supply!